

What are Inodes?
At its core, an inode, or index node, isn’t just a technical term; it’s the beating heart of Unix-style file systems, ensuring that our files and directories aren’t just lost bytes in the digital universe.
Think of an inode as a librarian of sorts. Instead of books, it keeps a record of filesystem objects like files or directories. Just like a librarian would tell you the shelf and row number of a particular book, the inode contains crucial details of the object’s data:
Defining the Components of an Inode:
- File Metadata: This encompasses crucial details such as permissions, ownership, and timestamps. This is akin to a book’s summary, briefly outlining its contents and letting you know the essentials at a glance.
- Pointers: These direct us to the exact locations where the object’s data is stored. Imagine these as the precise aisles and shelf numbers in a library, directing you to where your desired book awaits.
Remember, in the vast digital library of UNIX or Linux, every file or directory has its unique inode, much like every book in a real library possesses a distinct ISBN.
What Impact does an increase of Website Visitors have on Inode Count?
While at first glance, the relationship between website visitors and inode count seems non-existent, look closer. It’s not the visitors themselves, but their shadows, their footprints, that can leave a mark:
- Session Files: Temporary files that store data about a user’s interaction with a website, preserving the state of their activities. This is like each guest at a hotel being given a unique room, reflecting their preferences and stay duration.
- Cache Files: Data stored temporarily to quickly serve recurring user requests without repeatedly accessing the primary data source. This is akin to a tour guide having quick shortcuts for frequent tourists, making their experience smooth and memorable.
- Logging: The methodical recording of events, transactions, or data flows in a system. Visualize this as a diary maintained by a website, chronicling every event and interaction.
- User-generated Content: This encompasses content created and uploaded by the users themselves on a platform. This is comparable to giving visitors a canvas and paint, allowing them to add their personal touch to an art gallery.
The Relationship between Inodes and CPU Cycles
Although they often operate in distinct realms, inodes and CPU usage sometimes intersect, influencing and impacting one another:
- File System Operations: Activities involved in accessing, altering, or overseeing files within a system. Think of this as the bustling activities within a library, where books are frequently borrowed, returned, or rearranged.
- Exhausting Inodes: The scenario when all inodes on a file system, whether in use or not, reach their maximum. This is akin to a fully booked hotel with no vacant rooms, unable to accommodate any new guests.
- Cleanup and Maintenance: The systematic processes designed to get rid of superfluous or temporary files and assure the smooth functioning of a system. Picture this as the routine cleaning and upkeep of a park, ensuring it remains inviting and pristine.
- Monitoring Systems: Tools or software developed to observe and report on diverse system activities and metrics. This is like having vigilant security guards at an event, always on the lookout for any irregularities.
- Web Hosting Environments: Platforms granting individuals or firms the means to make their website accessible on the internet. Imagine this as a vast digital mall, where different businesses rent spaces to set up their unique shops.
How to reduce Inode Counts/CPU usage Specifically for SiteGround hosting:
1. Reduce the time frequency of Cronjobs or disable them
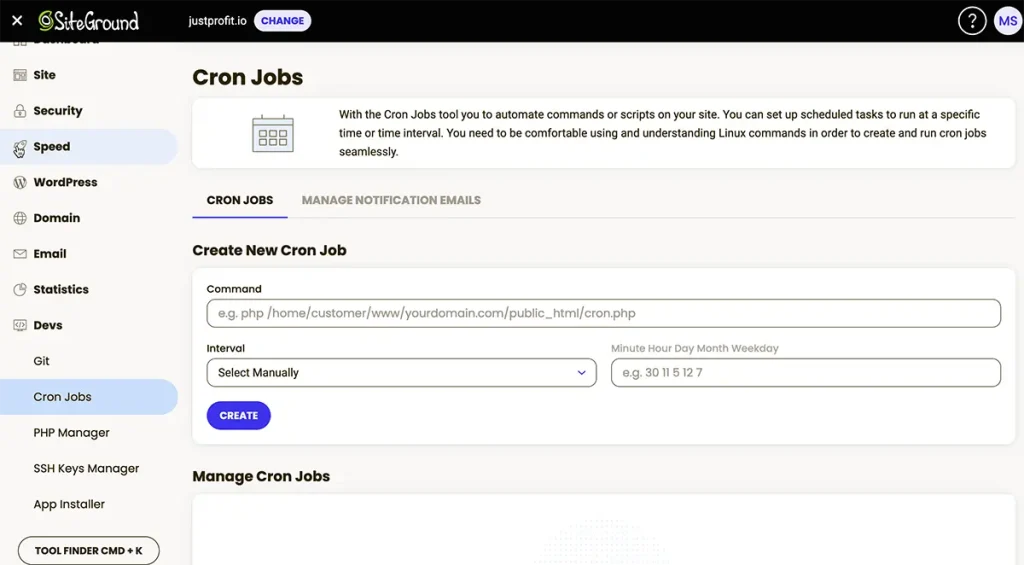
The Cron command-line utility, also known as Cron job, is a job scheduler that runs periodically at fixed times, dates, or intervals. You can think of a cron job as a task that is scheduled to run at defined period in time.
In SiteGround, Cron jobs are set to run of on every site visit. You should change that setting for it to run every 10 minutes.
As a matter of fact you can set the interval for any specific Cron job to any amount of time of your choosing. You just need to understand the purpose of the Cron job and be comfortable with the time interval for it to run.
In SiteGround under Websites option, select Site Tools and then to the left Under “DEVS” you will see an area for CronJobs. From there, select each Cronjob in the list and set it to a new time interval.
2. Upgrade to the Latest version of PHP.
With each new PHP version, not only increases the performance of how fast your site loads, but it also decreases the resources needed to run your site.
You should always use the latest version of PHP. As a matter of fact, SiteGround even allows you to change the version of PHP to a higher version then what is currently supported. Keep in mind, going up in PHP versions, might cause some issues with themes and plugins where the respective developers, have not yet made their themes and plugins compatible with the future versions.
In SiteGround, under Websites option, select Site Tools and then to the left Under “DEVS” you will see an area for PHP Manager, Under your PHP Manager area, you will learn what version of PHP you are running, in addition you can change the version and upgrade to Ultra-fast PHP. As of writing this article, the latest version of PHP is 8.1

3. Optimize WordPress Heartbeat
The WordPress Heartbeat API checks your post edit pages every 15 seconds and your dashboard and front end every 60 seconds, even in the absence of scheduled tasks. This can generate high CPU usage if you leave browser tabs in which you’re logged to WordPress opened for a longer period of time. You can modify these settings to reduce load.
How to Limit WordPress Heartbeat
To limit the functionality of the WordPress Heartbeat plugin, you can adjust the execution frequency for individual locations. This can be done using the SiteGround Optimizer Environment tab for each of the three locations. By saving the changes, you override the default Heartbeat execution frequency with the value specified in the Frequency slider option. Alternatively, you can utilize the menu to select the option Disable for the selected location, which will disable the Heartbeat feature for that place.
With the new settings in the SiteGround Optimizer plugin, you can either totally disable the Heartbeat API if no functionality requires it, or configure it to run at significantly larger intervals. By default, SiteGround disables it on your admin and front end pages, leaving it to run every 180 seconds on post edit pages.

4. Make use of caching
One of the nice things about SiteGround is that it offers caching as part of your hosting plan. You do not need additional plugins to turn it on.
Caching is a mechanism to improve the performance of any type of application. Technically, caching is the process of storing and accessing data from a cache. A cache is a software or hardware component aimed at storing data so that future requests for the same data can be served faster.
Caching takes off a significant amount of load of your server which in turn saves you CPU utilization.
In addition, SiteGround offers its users, 3 types of caching which are static, dynamic & Memcached. You should take advantage of all of them. Using the SG Optimizer settings, they are to easy to configure. All you need to do is turn on the switch.

5. Monitoring Total Cache Files
Today, web applications such as WordPress, typically use file caching by default, resulting in the creation of a large number of cache files within your hosting account. When this happens, you will experience an increase in your CPU cycle usage/inodes count.
For WordPress, you will need to FTP or SFTP into your server and look in the wp-content folder for folders with similar names as “cache” and clear them. So here basically you need to clear old cache files and use caching mechanisms that don’t rely on individual files for each cached item.
6. Remove staging sites and old backups no longer needed
If left unchecked, backups that are produced automatically by plugins or other third-party services frequently use up all of the available disk space. To conserve disk space and reduce the number of CPU usage/ inodes, download unnecessary backups and remove them from your hosting account.
You may examine your current staging copies under: Site Tools > WordPress > Staging Area and remove any that you no longer need.
7. Get Rid of Inactive Plugins & Themes
In WordPress, any inactive plugins or themes can increase your inodes count and CPU usage, even if they’re deactivated. It’s essential to remove unused plugins and themes to manage your resources efficiently.
It’s worth noting the distinction between the effects of inactive plugins and inodes: while inactive plugins don’t directly affect site performance, they do contribute to the consumption of CPU cycles and inodes. So, regular maintenance is vital to ensure optimal resource utilization.
8. Eliminating Unused Image Sizes
In WordPress, your theme may generate duplicate, unneeded copies of each submitted image. Check your theme’s options and leave only the images you’re currently using.
You can use a plugin such as: Regenerate Thumbnails. First you will need to delete the copies of the images you are not using, then regenerate thumbnails by removing unneeded sizes, using the plugin.
9. Delete the .opcache folder
You will only be able to access and delete the.opcache system folder using SSH. Once deleted, it gets rebuilt, minus the cache from previous PHP versions and or code that is no longer being used.
10. Delete Old Core WordPress Files
Sometimes, after WordPress updates, old core files can remain on your server. Tools and plugins like WP-Sweep can help clean up old and obsolete files.
11. Leverage a CDN such as Cloudflare's
Users should leverage a Content Delivery Network (CDN) to enhance the speed and efficiency of their websites. There are several CDN networks to choose from, and among the best is Cloudflare. Cloudflare’s CDN consists of a geographically distributed group of servers that work together to ensure the fast delivery of Internet content. This includes HTML pages, JavaScript files, style-sheets, and images. By caching static resources, Cloudflare effectively offloads these resources, saving substantial bandwidth and reducing the strain on your server’s load and bandwidth.
One of the advantages of Cloudflare is that it doesn’t necessitate an extra CDN subdomain or hostname, meaning you won’t have to modify your URLs. It bolsters the speed of customer websites by caching a copy of the site’s content on its globally distributed data center servers.
It’s worth noting that SiteGround once had a partnership with Cloudflare but has since parted ways. Nevertheless, individuals and businesses can still benefit from Cloudflare’s offerings. They provide a free plan that can notably reduce your CPU usage and inode count. For those looking for enhanced features and protection, Cloudflare’s pro plan is available for $20 a month, offering a plethora of optimization choices and a Web Application Firewall (WAF). However, for those on a tighter budget, Cloudflare’s free plan remains an excellent option.
12. Blocking Bat Bots

What is a bot? A bot is a software application that automatically performs certain tasks quickly and at scale. It is a tool that can be used for good or bad purposes. Bad actors use bad bots to spam, scrape, scan your site, sending thousands of requests per minute which in turn exhaust your CPU resources.
One way to block bad bots is using the “Blackhole Pro” plugin. It is very easy to use and has many rich features. It blocks the bad bots automatically for you.
A second method that you can leverage to get rid of the bad bots is to use the Cloudflare business plan for $20 a month, which has strong capabilities in blocking them.
Lastly, you can block them by examining your site for strange or harmful bots that visit it on a regular basis.
Create a list to keep track of host names or IP addresses that will appear in your security log. Conduct a Google search for each of the host names to determine whether they have been flagged as problematic bots by other website developers.
Bear in mind that you’ll need to conduct some study to determine whether a bot is a spam bot.
13. Disable Xml RPC PHP
What exactly is XML-RPC?
XML-RPC for WordPress was created to facilitate remote communication between your site and third-party apps.
This implies that users can connect with their WordPress site via a variety of alternative blogging platforms or mobile applications. This was advantageous in the early days of the internet, when users desired to modify content offline and then post it via their WordPress site.
Certain circumstances will require the use of XML-RPC. However, technological advancements have significantly limited the use and functionality of XML-RPC since its introduction. As a result, the initial benefits of this feature have been exceeded by the potential security dangers associated with leaving it enabled.
What is the purpose of disabling XML-RPC?
There are security issues connected with enabling XML-RPC. These may include the following:
Brute Force Attacks – In this type of attack, an attacker uses XML-RPCc to try thousands of username and password combinations until they get access to your site. This is because xml-rpc does not have the same limit on login attempts that WordPress does.
DDoS Attack – A type of attack in which an attacker uses XML-RPC to ping back thousands of IP addresses. This enables them to deliver a deluge of data and traffic, resulting in network outages and even network shutdowns. All this activity can have severe detrimental effects by skyrocketing your CPU utilization.
Please see our comprehensive WordPress security Guide where there is a section about how to disable XML-RPC
14. Keep your email and web hosting separate!
Keeping your email and web hosting separate has several advantages. Email consumes a lot of resources and CPU utilization. Having email hosted with a different provider will significantly reduce your CPU utilization, since your hosting and email will not be sharing the same resources.
In addition, if you host both email and your website on one server using the same hosting plan, you risk losing both email service as well as your website being down if there are any outages.
It is best to have dedicated resources just for email and dedicated resources just for your web hosting. You can use Google email or the Microsoft 365 with outlook by pointing your email records to a new provider such as Domain.com for about 5 dollars a month.
Having dedicated resources for email as well as the webhosting is the smart way to go and it significantly reduces your CPU usages.
15. Optimize your images
WebP is a contemporary image format developed by Google, aimed at striking a balance between image quality and file size. By employing both lossy and lossless compression methods, it considerably speeds up website loading times and cuts down on bandwidth consumption.
For optimal image optimization, I recommend using Adobe Photoshop. When saving your images in Photoshop, select the WebP format. Adobe Photoshop offers superior control, allowing you to determine the exact compression level for each image with a sliding scale under the “Save As” option.
While numerous plugins claim to convert your images to the WebP format, they aren’t truly essential.
Alternatively, you can utilize the SiteGround Optimizer plugin, which automatically converts your images to the WebP format.
16. Make use of Compression and Auto-Optimize your files.
The SiteGround Optimizer plugin provides a one-click setup to compress your HTML, JavaScript, and CSS files before they are sent to the browser. Compressed files lead to quicker loading times and reduced strain on your resources, resulting in lower CPU usage.
Additionally, the “Asset Optimization” and “Compress” features in the SiteGround Optimizer plugin enable you to inline, combine, defer, or relocate files to enhance page speed, all without the need for coding expertise.
By optimizing assets, you can lessen the server load, thereby decreasing CPU usage and the inode count.
17. Keep your database optimized
Ensuring your database remains optimized is vital to prevent excessive CPU resource consumption.
SiteGround, understanding this necessity, has introduced an efficient database clean-up feature. Easily accessible through the SG Optimizer plugin, this tool can significantly aid in reducing your CPU usage.
Although this feature from SiteGround provides excellent results, if you’re aiming for in-depth database optimization, I would recommend the WP Reset plugin, which is one of the most comprehensive tools for the job.
18. Manual Cleanup of Log files
Here’s a guide to manage log files on a SiteGround hosting:
- Access Log Files through the use of an FTP/SFTP or through SiteGround’s File Manager
- Inside the logs directory, you can delete older logs that you no longer need. This action should be done with caution. Ensure you are deleting only logs and not essential files.
19. Upgrading your Hosting Plan
Before considering an upgrade to your hosting plan, focus on optimizing your site as it grows and gains popularity. Start by applying the strategies and steps previously mentioned. Only when these measures have been exhausted and as a last resort, should you contemplate upgrading your hosting plan with SiteGround to address CPU limitations and inode usage.
20. Control the use of High CPU limits.
WordPress is renowned for its thousands of plugins that can transform and enhance your website.
However, not all plugins are efficient; some can be resource-intensive, even the premium ones that offer valuable features. As a website owner, it’s essential to evaluate your plugins, discerning which ones are indispensable and which can be replaced or removed. In some cases, a simple code adjustment can replace a plugin’s functionality.
To monitor your website’s resource usage and identify the most demanding plugins, consider using the free plugin, Query Monitor. It’s an insightful tool for diagnosing various WordPress issues. Remember to deactivate it once you’ve completed your troubleshooting.